「用 Canvas 畫圖」修訂間的差異
出自 MozTW Wiki
Danielwang(對話 | 貢獻) 小 (修樣板) |
Danielwang(對話 | 貢獻) (→使用路徑) |
||
| 行 41: | 行 41: | ||
<code>fillRect</code>、<code>strokeRect</code>、與 <code>clearRect</code> calls 繪製填充、輪廓線、與透明的長方形。較複雜的形狀用路徑(path)。 | <code>fillRect</code>、<code>strokeRect</code>、與 <code>clearRect</code> calls 繪製填充、輪廓線、與透明的長方形。較複雜的形狀用路徑(path)。 | ||
| + | === 使用路徑 === | ||
| + | |||
| + | <code>beginPath</code> 函數開始一個新的路徑,<code>moveTo</code>、<code>lineTo</code>、<code>arcTo</code>、<code>arc</code>、與類似的函數加入路徑片段。路徑可用 <code>closePath</code> 把頭尾連起來。建立路徑之後你可以用 <code>fill</code> 或 <code>stroke</code> 來把路徑繪製到 canvas 上。 | ||
| + | |||
| + | [[Image:canvas_ex2.png|right|frame|範例二]] | ||
| + | <html> | ||
| + | <head> | ||
| + | <script type="application/x-javascript"> | ||
| + | function draw() { | ||
| + | var canvas = document.getElementById("canvas"); | ||
| + | var ctx = canvas.getContext("2d"); | ||
| + | |||
| + | ctx.fillStyle = "red"; | ||
| + | |||
| + | ctx.beginPath(); // 開始路徑 | ||
| + | ctx.moveTo(30, 30); // 移到 30, 30 | ||
| + | ctx.lineTo(150, 150); // 作直線到 150, 150 | ||
| + | ctx.quadraticCurveTo(60, 70, 70, 150); // 作一元二次方程曲線到 70, 150 | ||
| + | ctx.lineTo(30, 30); // 作直線到 30, 30 | ||
| + | ctx.fill(); // 塗滿路徑 | ||
| + | } | ||
| + | </script> | ||
| + | </head> | ||
| + | <body onload="draw()"> | ||
| + | <canvas id="canvas" width="300" height="300"></canvas> | ||
| + | </body> | ||
| + | </html> | ||
| + | |||
| + | 呼叫 <code>fill()</code> 或 <code>stroke()</code> 會使得目前的路徑被用掉。要再塗滿或畫線的話,路徑必須要重建一次。 | ||
於 2005年10月23日 (日) 19:17 的修訂
「用 Canvas 畫圖」尚未編寫完成。你現在就可以編修本頁面,擴充本文內容。
簡介
Mozilla Firefox 1.5 裡有個新的,作用為可編程圖片的 HTML 元素。<canvas> 根據 WhatWG canvas 規格,而這又是根據 Apple Safari 裡的 <canvas> 實作。這元素可用來利用程式碼在客戶端上繪製圖表、介面、或其它自訂圖片。
<canvas> 會建立固定大小的繪圖空間,並會有一個或多個「繪製態」(rendering context)。在本文裡我們會專注在 2D 的繪製(這也是目前唯一有定義的繪製態)。在未來將會更多的繪製態來提供其它類別的繪製,例如使用 OpenGL 的 3D 繪製。
平面
2D 繪製態
簡單的範例
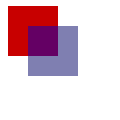
我們一開始先來一個簡單的,一個半透明正方形蓋在另一個正方形之上的範例:
<html>
 <head>
  <script type="application/x-javascript">
function draw() {
 var canvas = document.getElementById("canvas");
 var ctx = canvas.getContext("2d");

 ctx.fillStyle = "rgb(200,0,0)";  // 把「填滿樣式」設為紅 200 綠 0 籃 0
 ctx.fillRect (10, 10, 50, 50);   // 畫一個填充的長方形

 ctx.fillStyle = "rgba(0, 0, 200, 0.5)"; // 把「填滿樣式」設為紅 0 綠 0 籃 200 透度 0.5
 ctx.fillRect (30, 30, 50, 50);          // 畫一個填充的長方形
}
  </script>
 </head>
 <body onload="draw()">
   <canvas id="canvas" width="300" height="300"></canvas>
 </body>
</html>
draw 函數先取得 canvas 元素,再取得 2d 態。ctx 這物件可用來實際在畫板上繪製。本範例以用 CSS 顏色設定 fillStyle(填滿樣式)與呼叫 fillRect 的方式來繪出兩個方形。第二個 fillStyle 是用 rgba() 來一併定義顏色與透度(alpha)的值。
fillRect、strokeRect、與 clearRect calls 繪製填充、輪廓線、與透明的長方形。較複雜的形狀用路徑(path)。
使用路徑
beginPath 函數開始一個新的路徑,moveTo、lineTo、arcTo、arc、與類似的函數加入路徑片段。路徑可用 closePath 把頭尾連起來。建立路徑之後你可以用 fill 或 stroke 來把路徑繪製到 canvas 上。
<html>
 <head>
  <script type="application/x-javascript">
function draw() {
  var canvas = document.getElementById("canvas");
  var ctx = canvas.getContext("2d");

  ctx.fillStyle = "red";

  ctx.beginPath();                        // 開始路徑
  ctx.moveTo(30, 30);                     // 移到 30, 30
  ctx.lineTo(150, 150);                   // 作直線到 150, 150
  ctx.quadraticCurveTo(60, 70, 70, 150);  // 作一元二次方程曲線到 70, 150
  ctx.lineTo(30, 30);                     // 作直線到 30, 30
  ctx.fill();                             // 塗滿路徑
}
   </script>
 </head>
 <body onload="draw()">
   <canvas id="canvas" width="300" height="300"></canvas>
 </body>
</html>
呼叫 fill() 或 stroke() 會使得目前的路徑被用掉。要再塗滿或畫線的話,路徑必須要重建一次。


